
Easter Window Suncatcher Craft Made with Tissue Paper
Easter is just around the corner, and what better way to brighten up your home than with a fun, creative project that you can enjoy doing with your little ones? This Easter window suncatcher craft is the perfect project to bring some cheerful spring vibes into your home, all while spending quality time together as a family. Whether you’re looking for a simple DIY activity to do on a rainy afternoon or a creative way to welcome the season, this craft ticks all the boxes!
What’s amazing about an Easter window suncatcher craft is how easy it is to make, and how it instantly transforms your space into a colorful celebration of spring. The materials are also super easy to get your hands on. You don’t need to be a craft expert or spend a ton of money to create a beautiful window suncatcher that will create magical rainbows all around your room.
I love how this craft gives you the chance to tap into your little one’s creativity and fine motor skills. You can work together to choose the colors, shapes, and designs that you want to make, creating a piece that’s not only cute but also completely unique to your family. Watching the light shine through the suncatcher is always such a satisfying feeling. Like a little burst of sunshine in your home!
So, if you’re ready to roll up your sleeves and get crafting, let’s dive right into how to make your own Easter suncatchers!
Supplies You’ll Need for this Easter Window Suncatcher Craft
Construction paper or some other sturdy, colourful paper to create the egg frame.
Tissue paper. Use a selection of colorful tissue paper. Pastel colors are great for spring.
Scissors to cut our easter egg templates.
A pencil or pen to trace the large egg shape.
A glue stick to attach the tissue paper squares to our spring suncatchers.
Sticky tape, washi tape or a ribbon to hang your colourful suncatchers.
How to make this Easter Window Suncatcher Craft
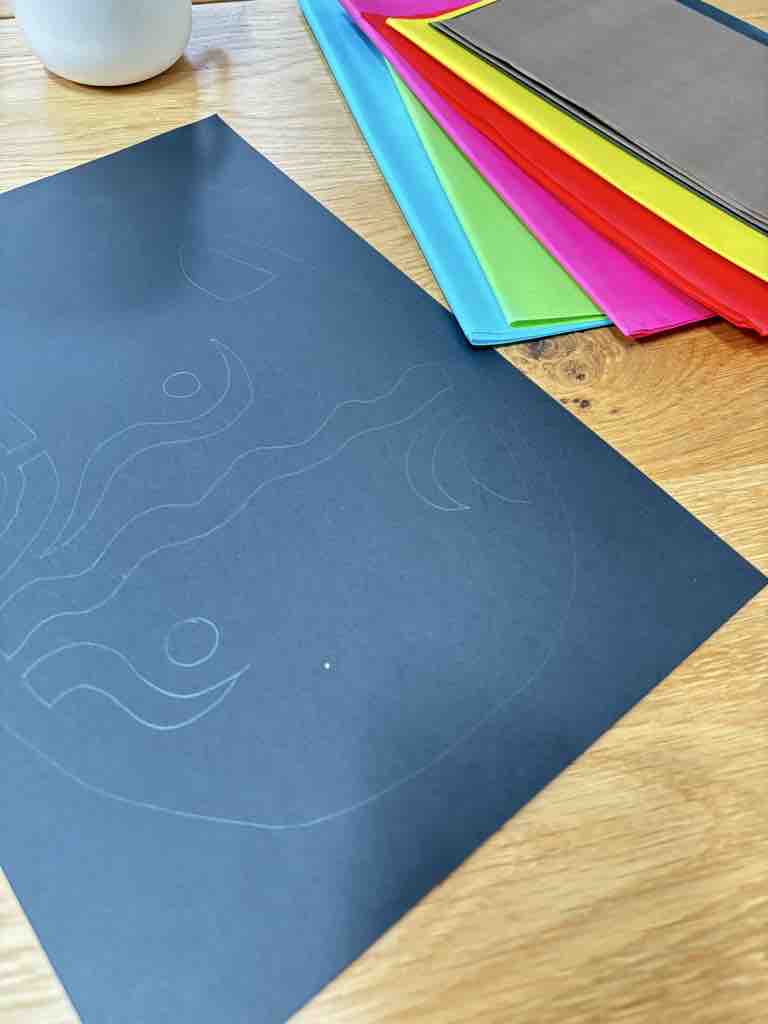
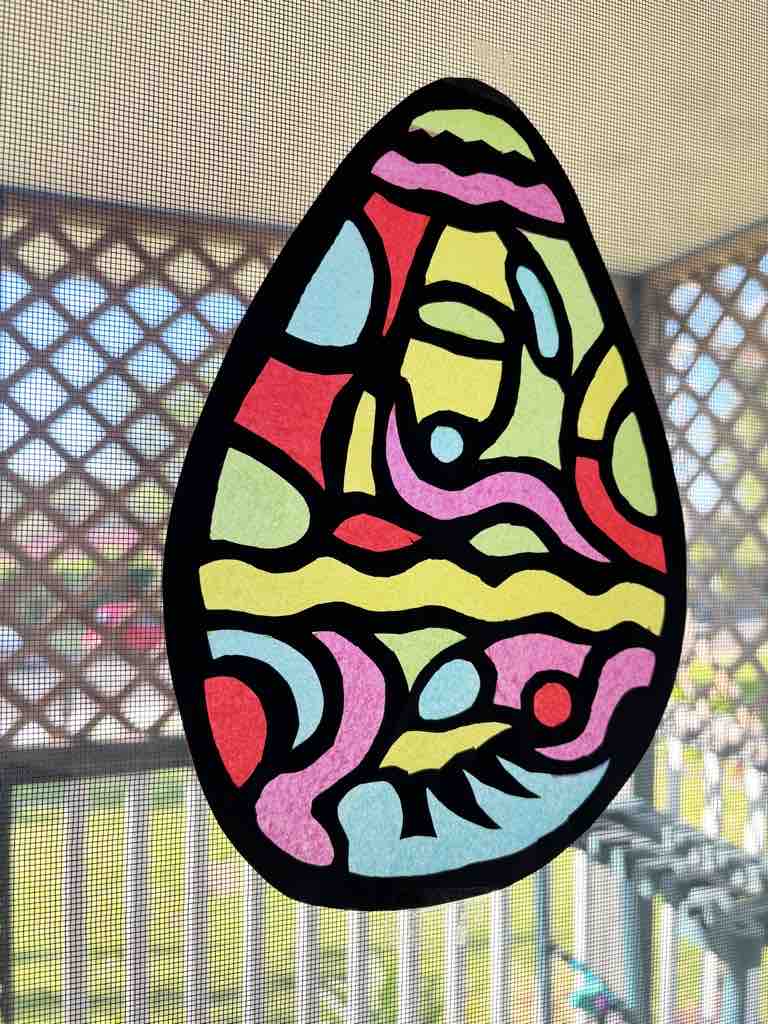
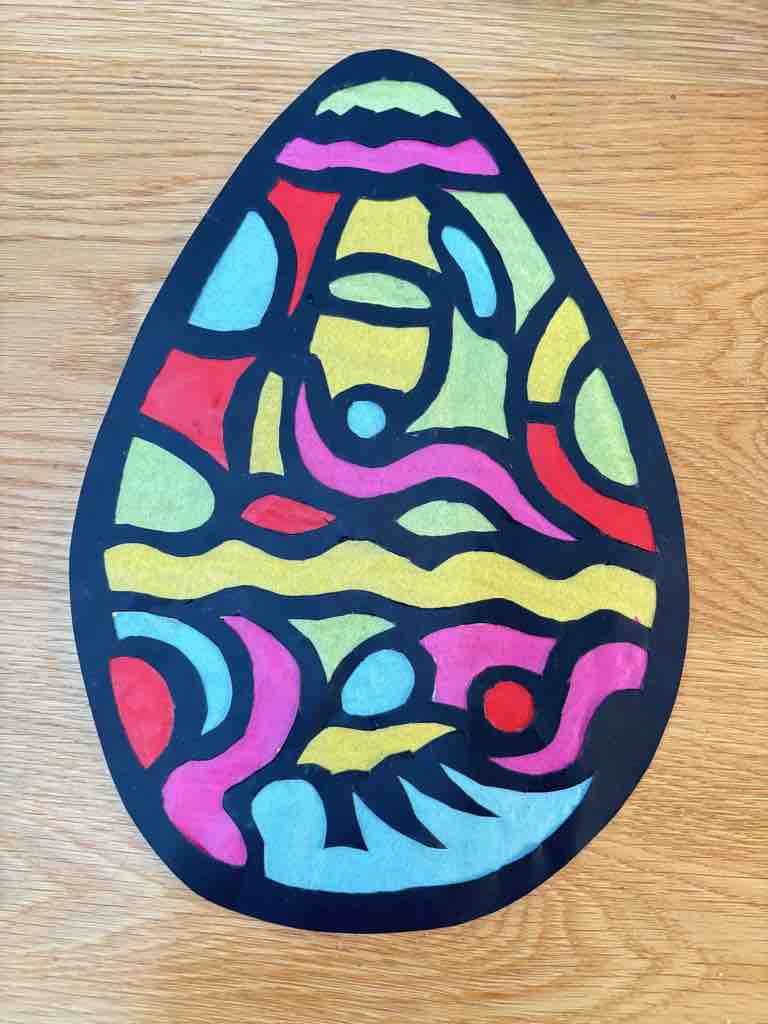
Create the Outline. Using a pencil or pen, lightly draw an easter egg outline onto a piece of construction paper.
Create edges and patterns. Draw a simple pattern into the egg. I like to use stripes, zigzags or waves. Make sure all parts of the design connect back to the outer edge of the egg. This is crucial so the frame remains in place when cutting.
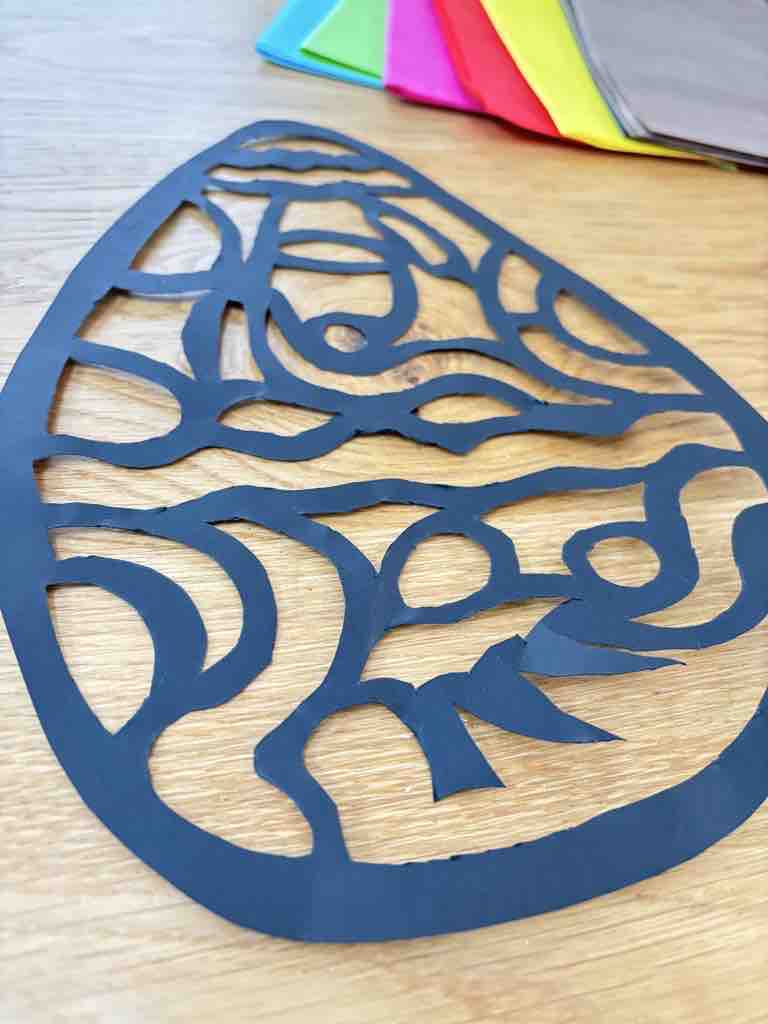
Cut. Using scissors or a craft knife, cut out the egg and inner sections of it.
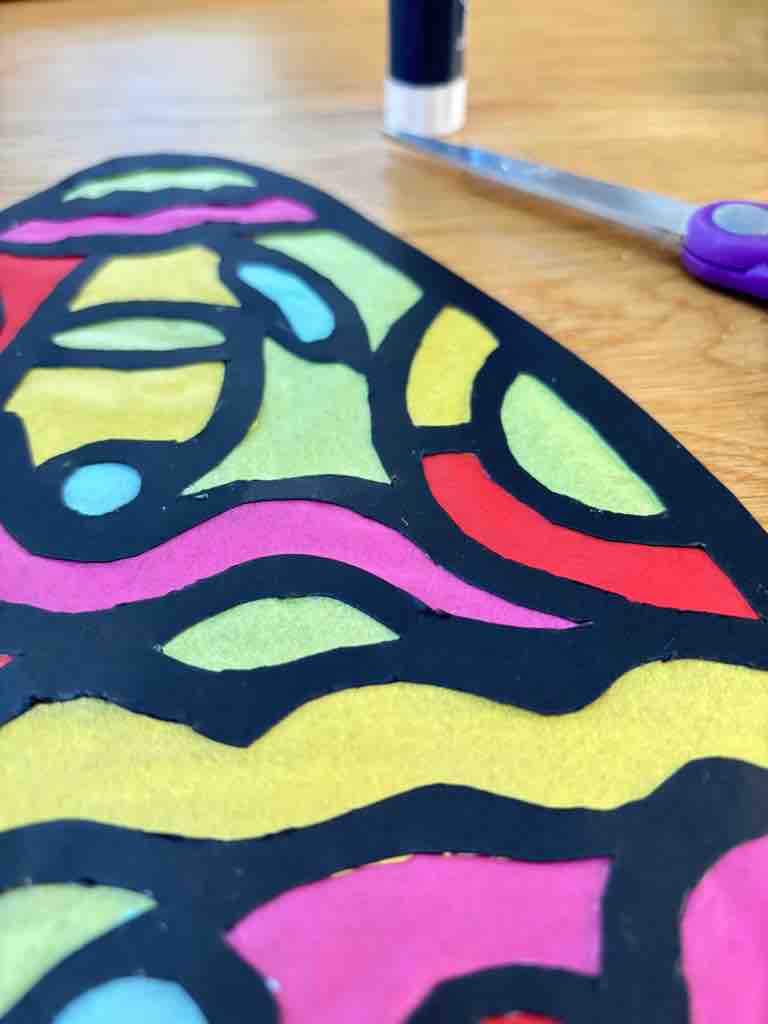
Add the Tissue Paper. Cut each piece of tissue paper into small pieces. Squares, circles, or other fun shapes all add more depth to your final design. Start gluing these pieces to the inside of your egg. Don’t worry about making it perfect! Layer the tissue paper to make it as colorful as you like. The more vibrant, the better!
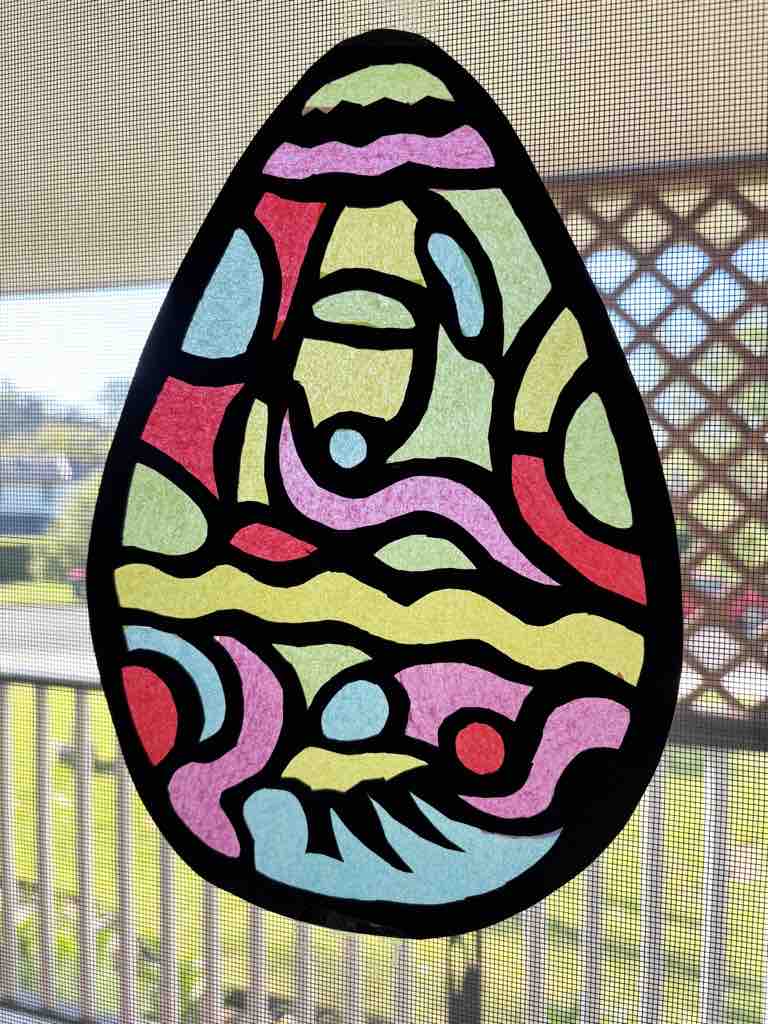
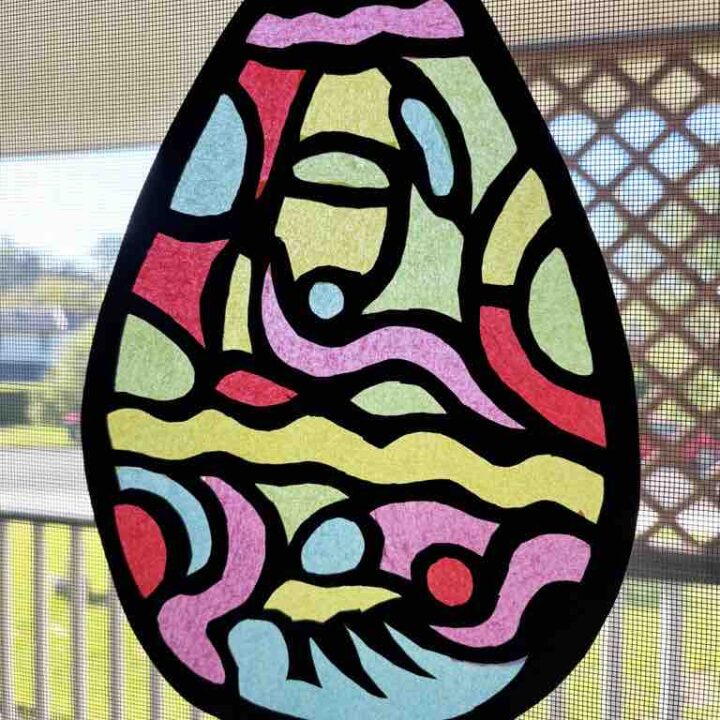
Attach to the Window and Enjoy. Attach your suncatcher to a sunny window. You can attach it using sticky tape or add a string to your design using a holepuncher.
Tips and Tricks
Use Different Colors. Experiment with various colors as an easy way to make your Easter window suncatcher really pop. You can go for a rainbow effect or stick to pastels for a more subtle, springtime look. The more colors, the more fun it will be!
Shape Variety. Don’t feel limited to just eggs or bunnies! Try making a collection of colorful suncatchers with different shapes. Maybe a whole set of flowers or even an Easter basket design. Kids love being able to make a variety of things!
Mix Materials. If you want to get extra creative, try adding in other materials like glitter, sequins, or even bits of fabric for a textured effect. It’s a great way to let your little ones add their own personal touch to this easy craft.
What to Avoid Doing
Don’t Rush. Give yourself and your little ones plenty of time to enjoy the process. Don’t worry about making everything perfect, this is all about creativity and fun!
Be Careful if Using Liquid Glue. Liquid glue can easily get out of control and run into your colored tissue paper. Make sure to only use a little along the suncatcher frame to stay in control.
Don’t Go Too Small. It can be tempting to create tiny, intricate designs. Once it comes to gluing these can often become tricky to work with and become quite frustrating, which won’t be much fun. Try to nail the large designs first before going smaller.
Keep Your Egg Suncatchers Moving. If you have sliding windows, attach your fun Easter crafts to the window that always remains on top. I have learned the hard way that art projects can easily get trapped between windows.
I love creating tissue paper suncatchers with kids of all ages! They’re such an easy spring craft that even little hands can create. They’re a great activity for the upcoming Easter season, and often entertain my lids for a little while. Whether you’re getting the whole family involved or are treating yourself to some creative down time. make sure to share a picture of your Easter suncatcher craft in the comments.
Easter Window Suncatcher Craft
Brighten up your home!
Materials
- 1 Sheet construction paper
- Various sheets of colourful tissue paper
Tools
- Scissors
- A pencil or pen
- Glue stick
- Sticky tape
Instructions
- Create the Outline. Using a pencil or pen, lightly draw an easter egg outline onto a piece of construction paper.
- Create edges and patterns. Draw a simple pattern into the egg. I like to use stripes, zigzags or waves. Make sure all parts of the design connect back to the outer edge of the egg. This is crucial so the frame remains in place when cutting.
- Cut. Using scissors or a craft knife, cut out the egg and inner sections of it.
- Add the Tissue Paper. Cut each piece of tissue paper into small pieces. Squares, circles, or other fun shapes all add more depth to your final design. Start gluing these pieces to the inside of your egg. Don’t worry about making it perfect! Layer the tissue paper to make it as colorful as you like. The more vibrant, the better!
- Attach to the Window and Enjoy. Attach your suncatcher to a sunny window. You can attach it using sticky tape or add a string to your design using a holepuncher.
Notes
Use Different Colors. Experiment with various colors as an easy way to make your Easter window suncatcher really pop. You can go for a rainbow effect or stick to pastels for a more subtle, springtime look. The more colors, the more fun it will be!
Shape Variety. Don’t feel limited to just eggs or bunnies! Try making a collection of colorful suncatchers with different shapes. Maybe a whole set of flowers or even an Easter basket design. Kids love being able to make a variety of things!
Mix Materials. If you want to get extra creative, try adding in other materials like glitter, sequins, or even bits of fabric for a textured effect. It’s a great way to let your little ones add their own personal touch to this easy craft.